Quantcast
Channel: David Revoy
Viewing all 526 articles
Browse latest View live

Painting with blending modes

$
0
0


Blending ... whaat? In digital-painting, you can paint with 'blending modes' applied on your brush. In short ; a blending mode is a math formula telling your software how to mix two colors : the ones on your canvas and the one on your brush. Knowing a set of useful blending modes can assist and ease your work for painting specific rendering.

Goal : This video tutorial ( on top ) aims to offer to the digital-painter pratical tips to use blending-modes on his brushes. I'll not show all the blending-mode as other tutorials do. I'll not perform here a cold listing of all blending modes as I saw on other tutorials. I'll also not show formulas and math : it's a painting tutorial. I'll aslo keep the list minimal with five one.

Where I can find it ? In Krita 2.9, the blending modes applied to your active brush is displayed on a button in the top toolbar. The default one is named 'Normal' , press this button and you'll get a list. This list contains favorites on top, and subcategories to unfold under. Each blending modes in the subcategories can join the top favorite list by checking the checkbox next to them.


Short summary :

Color dodge

Light, glows, coronas, lazers, neons ; this is the blending mode I use to manage all my light effect. It has advantage of a stronger saturation and contrast over other brightening blending mode (Linear Dodge, Addition, Screen).
In Krita : Lighten > Color dodge

Overlay

Contrast, vivid, boost colors here is my primary usage of my favorite blending mode : Overlay. Overlay is a conditionnal blending mode : it combine two blending mode in one. If you select a grey 50% ; it will do nothing. But over , and under this grey , Overlay will switch to a brightening or a darkening blending mode. Painting wih dark tones will intensify and vivid the area. It can be used also to boost colors and give an object the first role in your composition. Overlay is also known for it's conveniency on layer to 'overlay' a texture, or a pattern over a surface. 'Soft Light' is a more subtle variation of 'Overlay'.
In Krita : Mix > Overlay
Note: fun bug in Gimp since 10 years, 'overlay' is similar to 'Soft light'.

Lighten

Lighten is a comparative blending mode. Lighten will paint only if the value on the canvas is darker than the value on your brush. This propriety help me to shift values in the distance, and split different grounds on my artwork.
In Krita : Lighten > Lighten

Color

Changing the color is the obvious mission of the blendings modes 'colors'. I use the color blending mode to do a first pass of colorization over my grisaille. The result is often dull, and greish, but that's easy to fix with another pass of the overlay blending mode. I also use Color (HSY) with grey to desaturate zone, or do hue corrections.
In Krita : HSY > Color and HSL > Color HSL

Multiply

Shadows, stains, dirt, glazing, it's one of the king of the blending mode in digital-painting, the darkening-only one ; Multiply. White is equal to full transparency with multiply.
You can draw with this one on the surface of a shaded object, glaze skin shading to inject a bit of blood under the skin, add dirt or paint big casted shadows.


Five traditional textures

$
0
0

Five free HD traditional textures to overlay on your artworks, available in public domain/CC-0 ! 
They were all handmade by me, using brush and real painting . I made more of them, but this is my best-of. You can find this textures on many of my artworks. ( eg : [1][2][3]  or [4]  ).

Usage : Paste them on the top of an artwork, set the blending mode to 'overlay' and reduce opacity to your liking. Transform, rotate and position it. Erase parts if needed. Combine them.

Download :

All in Zip archive , 15MB :  texture-traditional_deevad.zip

Click on a thumbnail bellow for direct access to a single one :


Description :

( from left to right )
  1. Dry Stroke : Probably my best one, add many dynamic strokes to any artworks.
  2. Chaos : Stain, greasy strokes, and wet parts combined for boring backgrounds.
  3. Watercolor textures : add a typical grain to flat piece with too digital gradients.
  4. Wet Effect : wet vertical strokes smearing everything for texturing flat backgrounds.
  5. Watercolor effect : a map of various watercolor effects , from dry to wet, to dot.


Brushkit v7.0

$
0
0


For Krita 2.9, tested on Linux. Note: I don't own Windows or MacOsx system.
Brushes removed from previous V6 version can be found on the Bundle folder.
Repository on Github

Download :

Source code ( zip )
Source code ( tar.gz )
Bundle ( deevad.bundle )

Manual install

To install, download, decompress, and paste the resulting folders ( 'brushes' / 'paintoppreset' and 'patterns' ,etc... ) into your Krita user preference directory. You can open your preference directory in Krita this way : Setting > Manage Ressources > Open Resource Folder. For Linux users, here is the direct path : /home/<username>/.kde/share/apps/krita

Bundle install

To install, download the file , then import it in Krita this way : Setting > Manage Ressources > Import Bundle/Resources.

Things I learned in 10 episodes

$
0
0

Intro


Pepper&Carrot webcomic reached the episode 10 last month, with over 50 pages of comic published online. As you can probably guess, after over a year of production, I tried many things in order to improve qualityand style. I learned many things from my long 'trial and error' process. Now it's time to share what I've learned. I don't know if this notes will help other webcomic creators : we are all so complex and different about the creation process!  At least it secure myself to archive them down for now, in case I'll loose myself later in other long 'trial and error'.

1. Preproduction


a. Non Linear Storyboard, Concept-art and Scenario

A priori knowledge is to think scenario come first then concept-art and storyboard follow. In my case, the three area often all come together, nested, and dependent. It took me time to stop to be blocked in front of a text-editor, and directly start the episode with a pencil on paper.


b. Scenario : a Key idea

Reducing the scenario to a single key 'idea' or theme made me win a lot of time. It's faster and more effective to build-up an episode around a single sentence or concept than rescuing the hidden meaning of a large text.

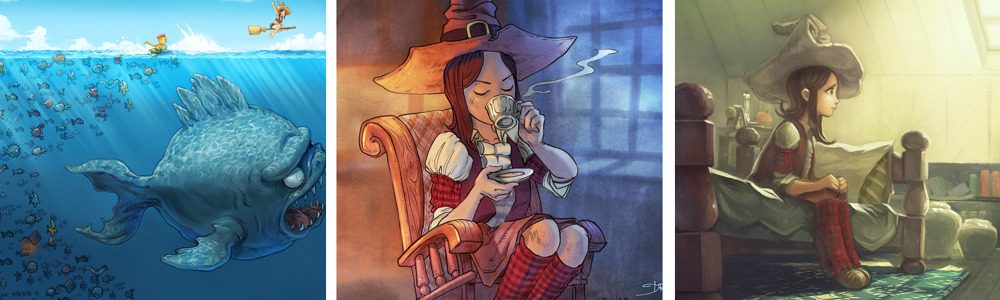
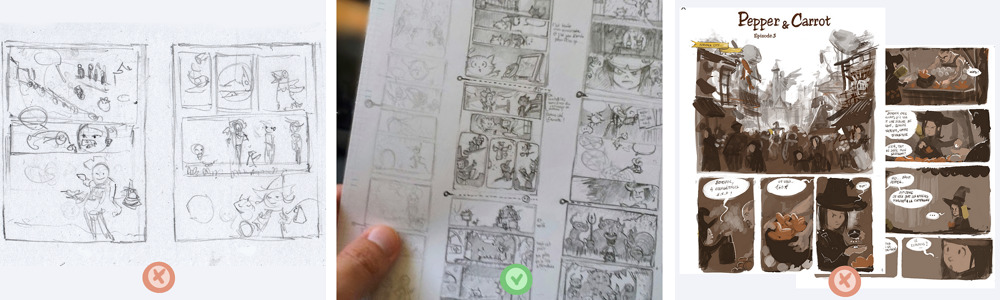
left : episode 10 key idea : "United we stand, divided we fall" and around the theme of "a big fish in a small pond".
center : episode 3 key idea : "Procrastination" and all effort to avoid facing a deadline.
right : episode 8 key idea : "friendship" and the stage of grief ( denial, anger, bargaining, depression and acceptance ).


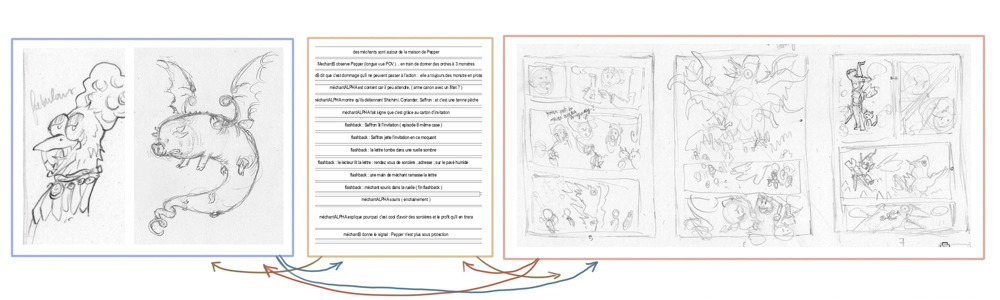
c. Concept-art : Random thumbnails

This is a meditative practice, to do most of the time far from computer or any notification monster. Just keep eye closed, and stop thinking, relax near a ballpen and a A4 paper. In my case, I often got panels, or mini-parts of story appearing in my mind ( then I open eyes to draw them quickly ). It's something I always trained when I was waiting for transport when I was younger, and it's just an imagination exercise. This exercise build a precious source of material.


d. Concept-art : improve them incrementally

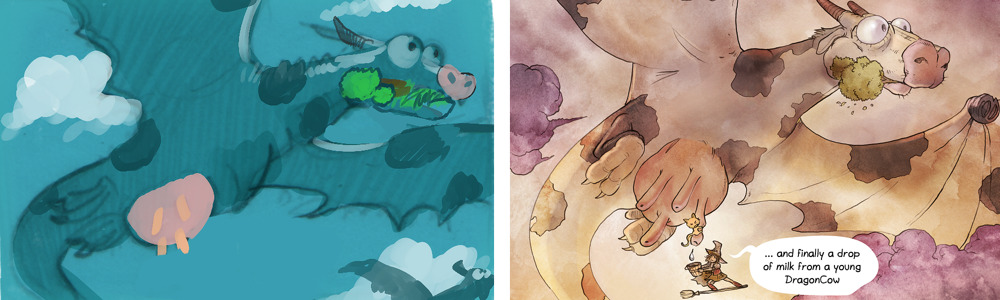
The skeleton of the story is easier to write with generic elements at first : 'dragon', 'city', 'home', 'cave'...etc... Skipping descriptions with generic terms offer more room for storyboard and concept-art to inject back ideas. Detailing too much the writing affect the creative work of concept-art and also of storyboarding.

Example : on scenario of episode 3, I wrote the generic  'milk from a dragon'
left : During painting concept-art of the dragon, I started to design it as a 'dragoncow'.
right : This idea get picked back and affected the speech-bubbles.


e. Storyboard : not too rendered, not too minimal

Storyboarding is the main product of my pre-production period. I tried many way for doing storyboards :  minimal to full-rendered in color. I prefer to draw them on paper ( thumbnails ) detailed enough to can read them. The small size constrain me to not overload the panel with element too little to be read. I often storyboard the start, the end, the middle (main scene) then the parts in between.

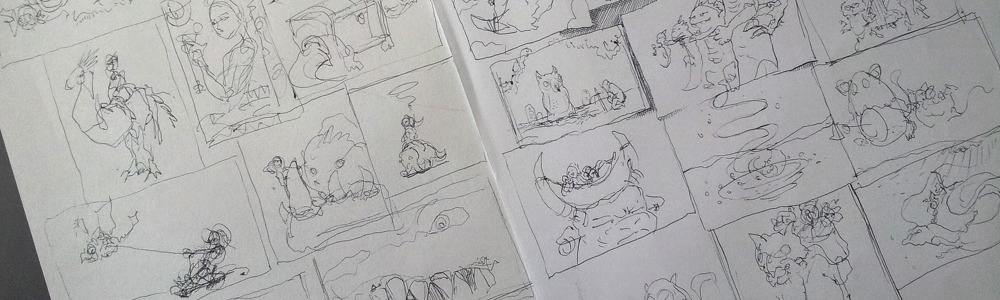
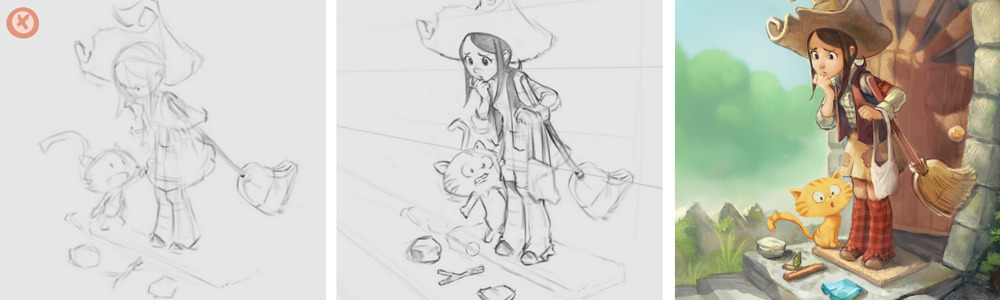
left: storyboard for episode 6, not enough detailed ; I had to modify it during the production.
middle: storyboard for episode 8, thumbnails detailed optimal to read already, a strong start for production.
right : episode 3, too detailed ; full color speedpainting , digital. Planning too much ahead is long and kills the pleasure during production.


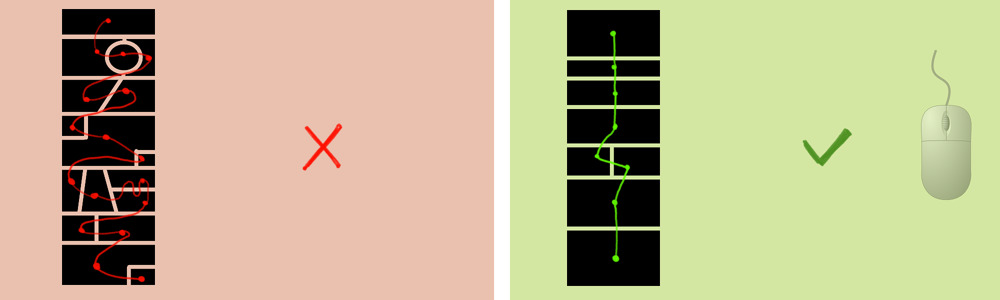
f. Storyboard : Ease reading for vertical scroll

Pepper&Carrot episodes are published on Internet. It implies scrolling vertically long pages to read the episodes. The scrolling action and nature of this big vertical page changes the way to design storyboard. Complex layout seen in printed comics, BD and manga can appears more complex when all pages are sticked together. That's why I try now to keep the layout simple.


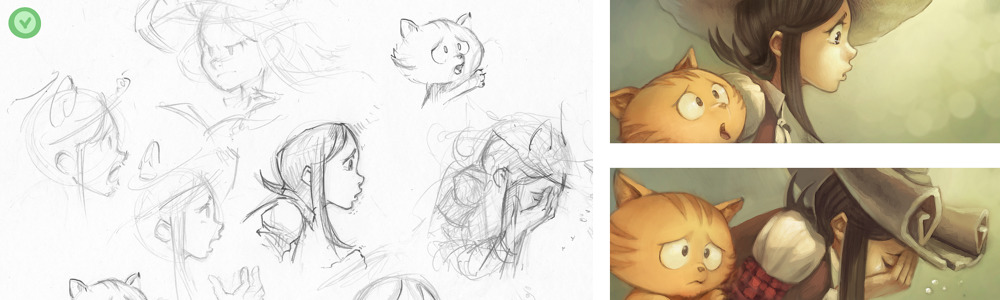
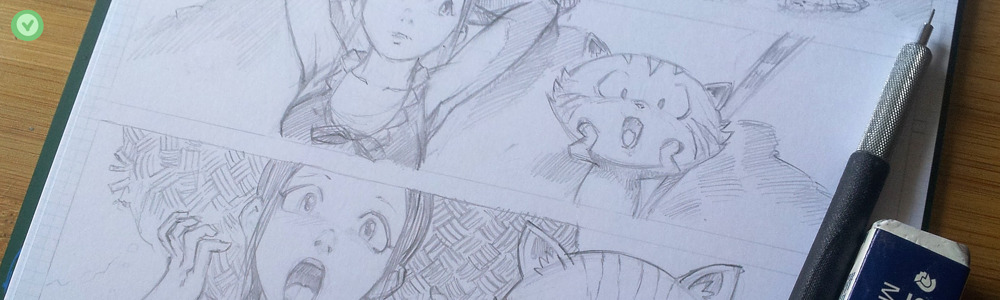
g. Sketches : Acting/Repetition exercices

Complex scenes exists, and a good storyboard reveals them. That's a part of the storyboard's job :) Doing sketches before drawing the final page can avoid a lot of trial and error ( undo/erase ).  Picture example : Pepper refrain herself to cries on episode 8, then breaks... I was very afraid of not being able to draw this scene.


2. Production


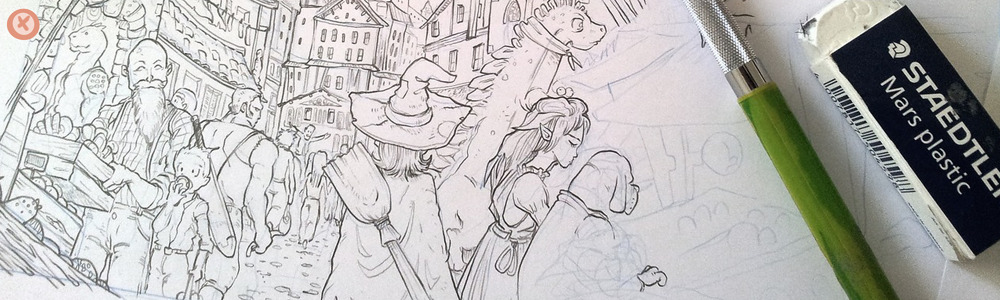
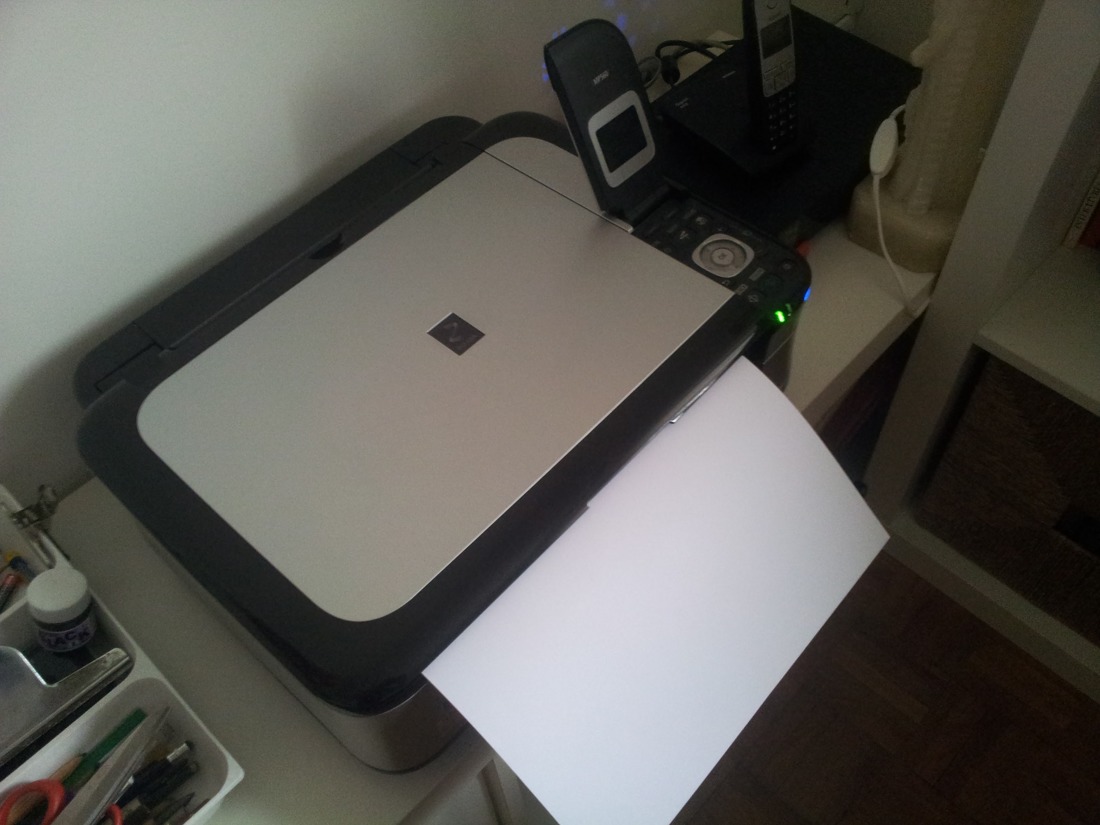
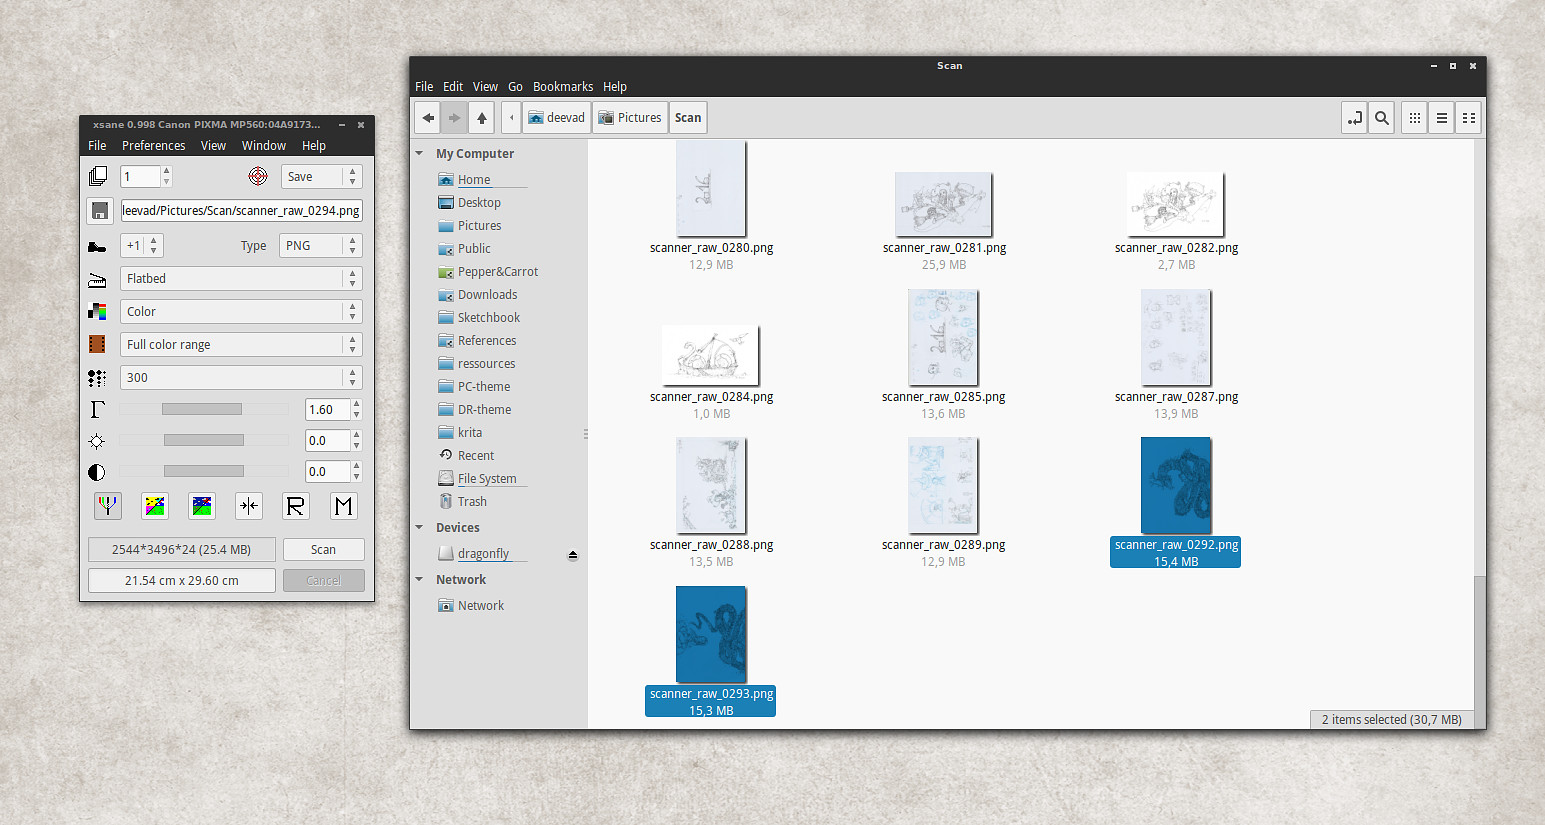
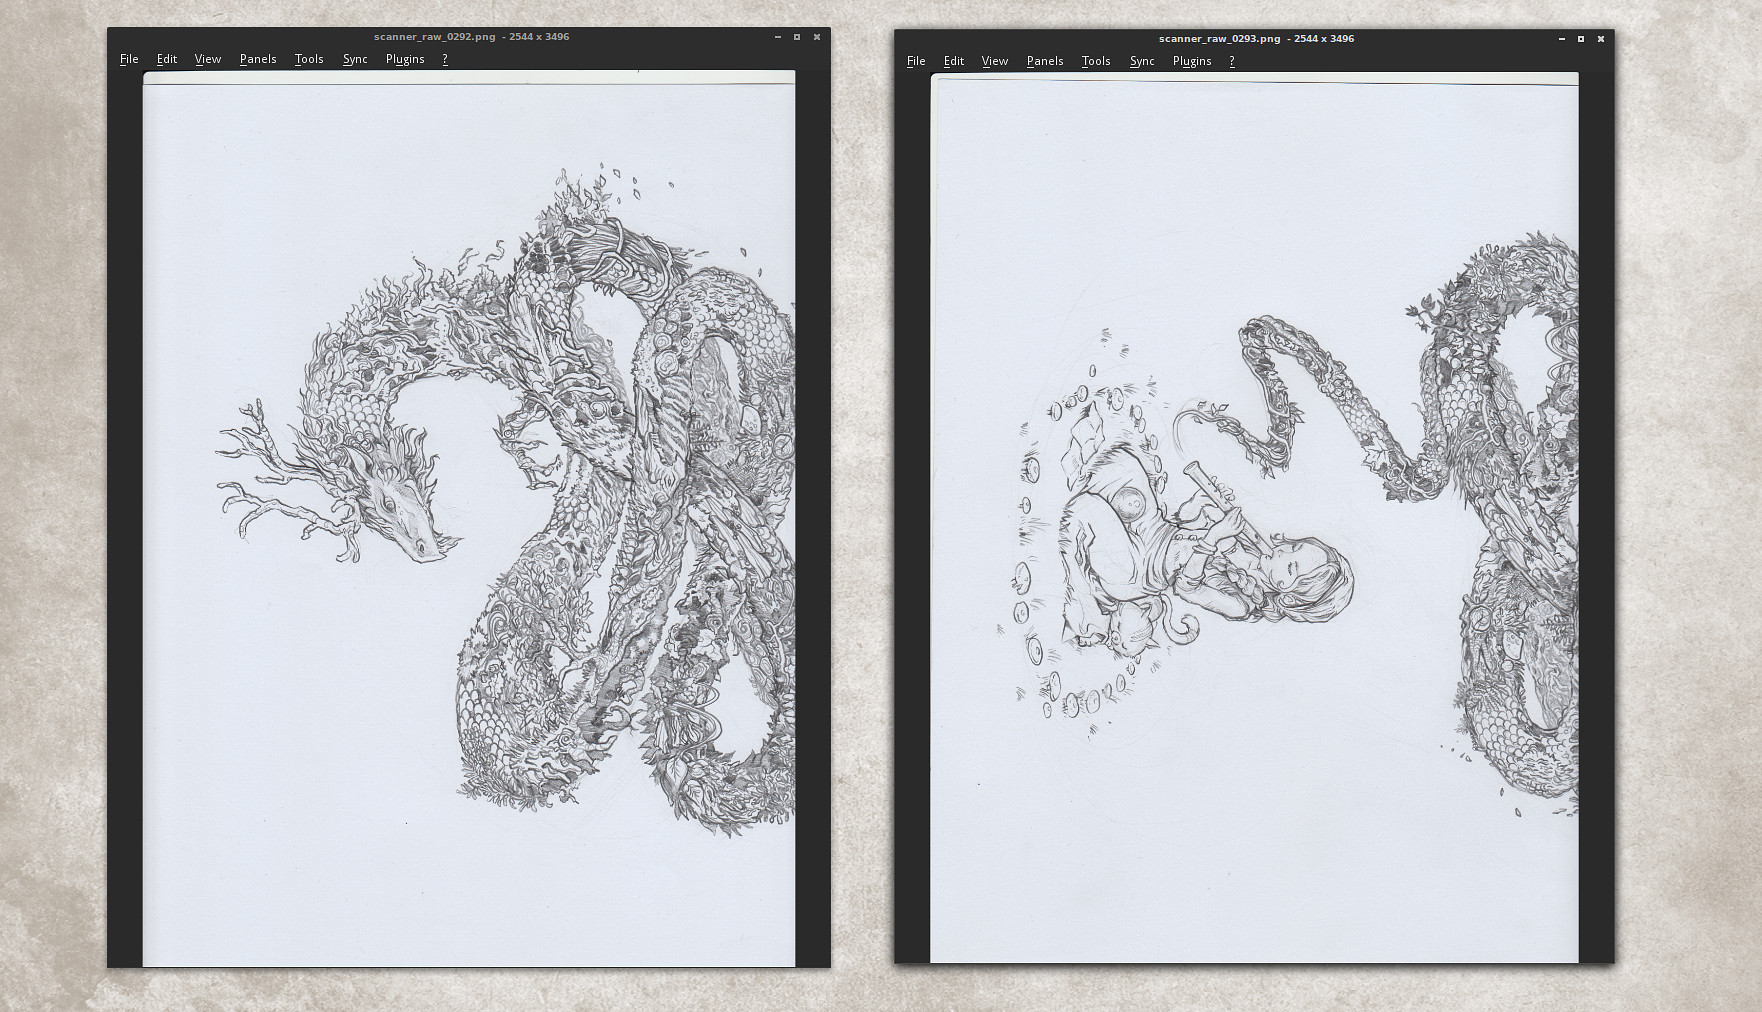
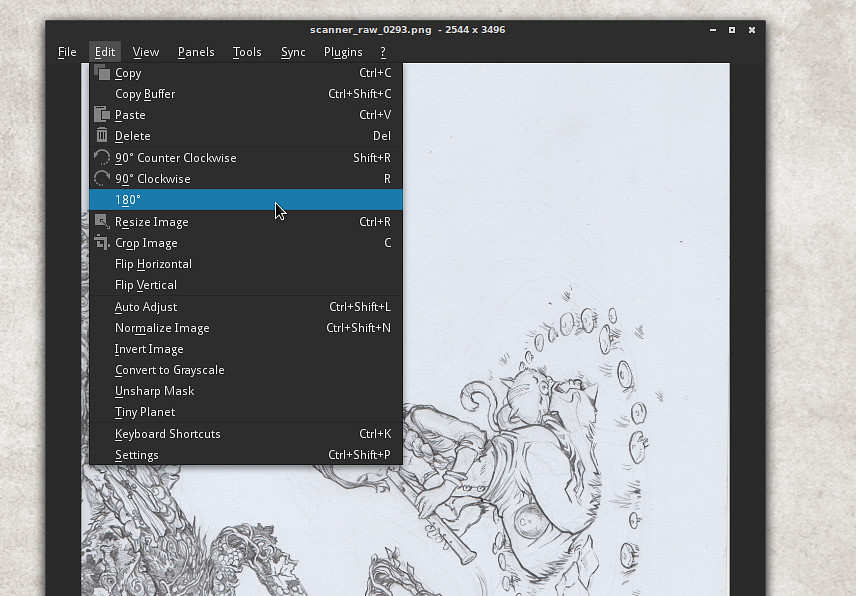
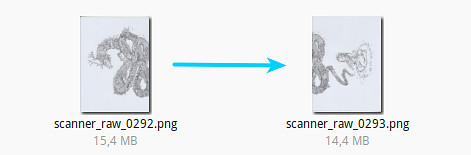
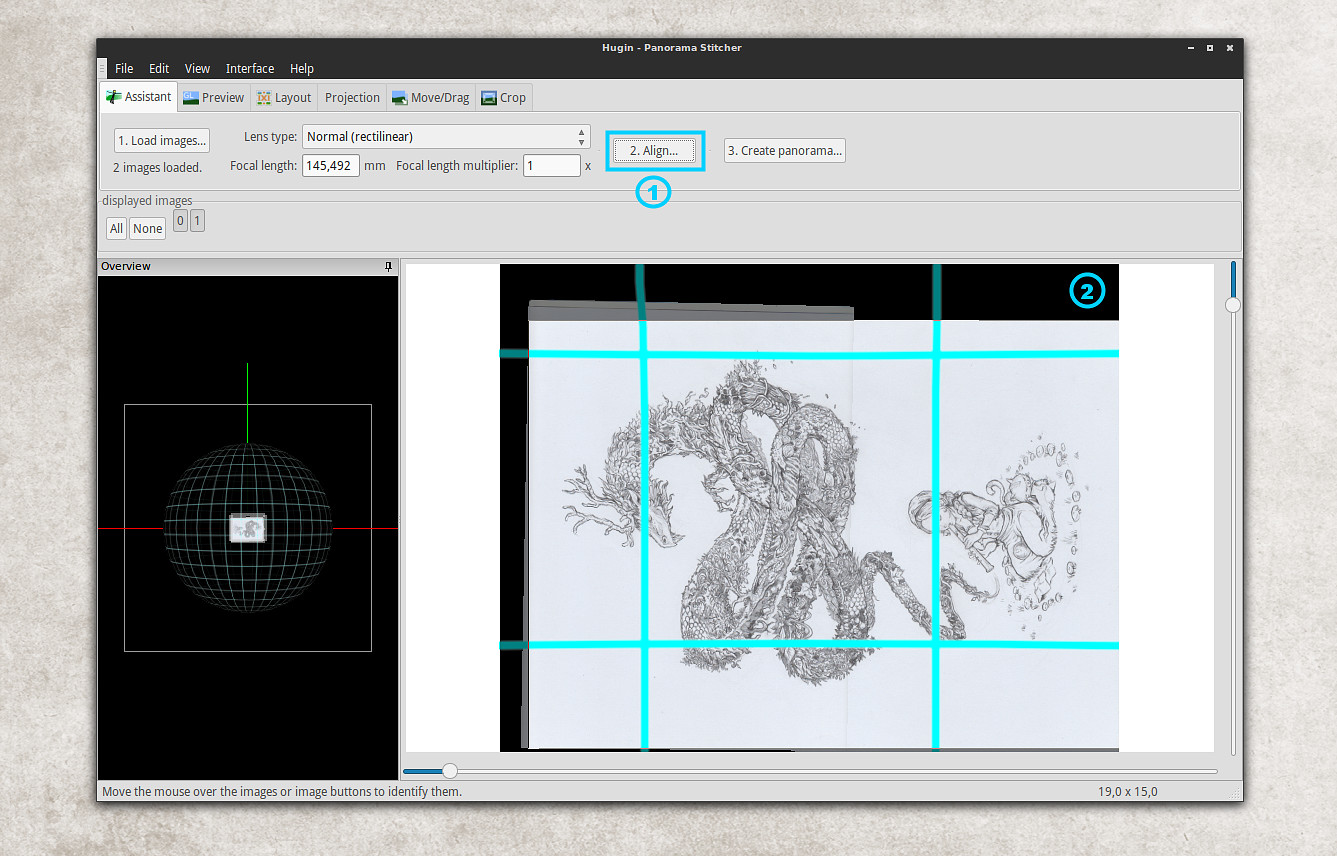
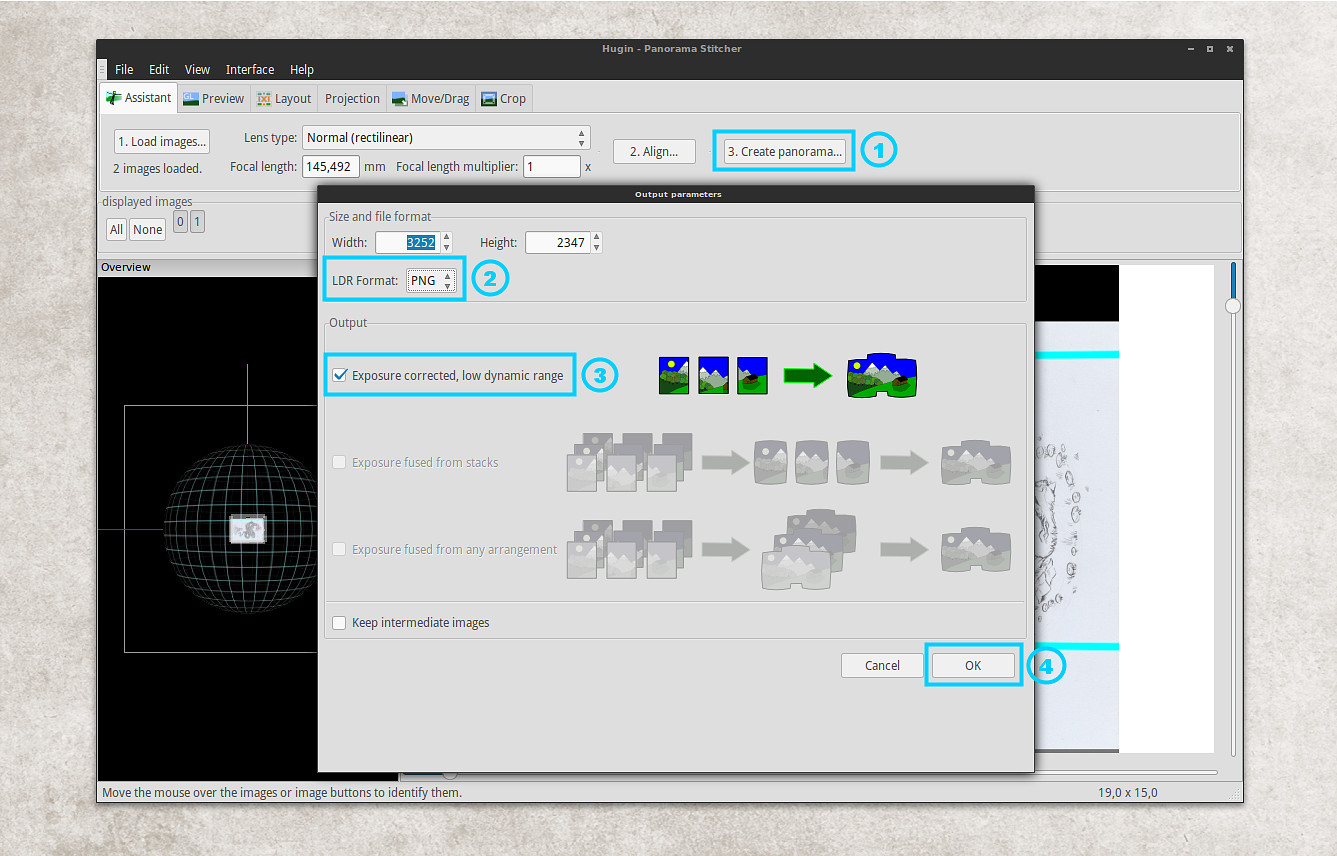
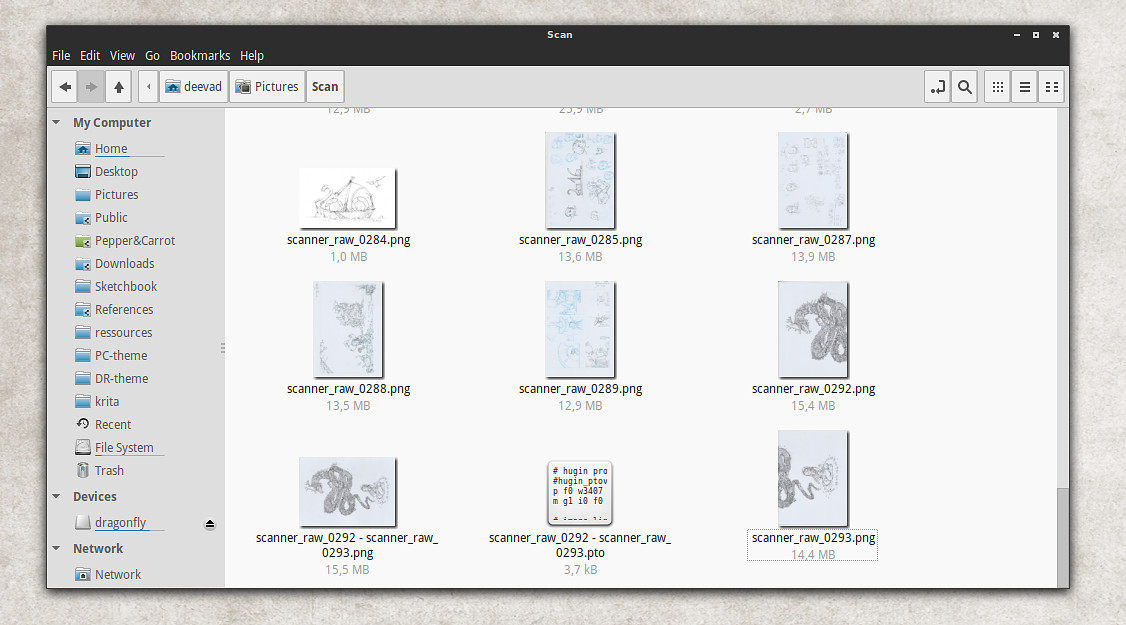
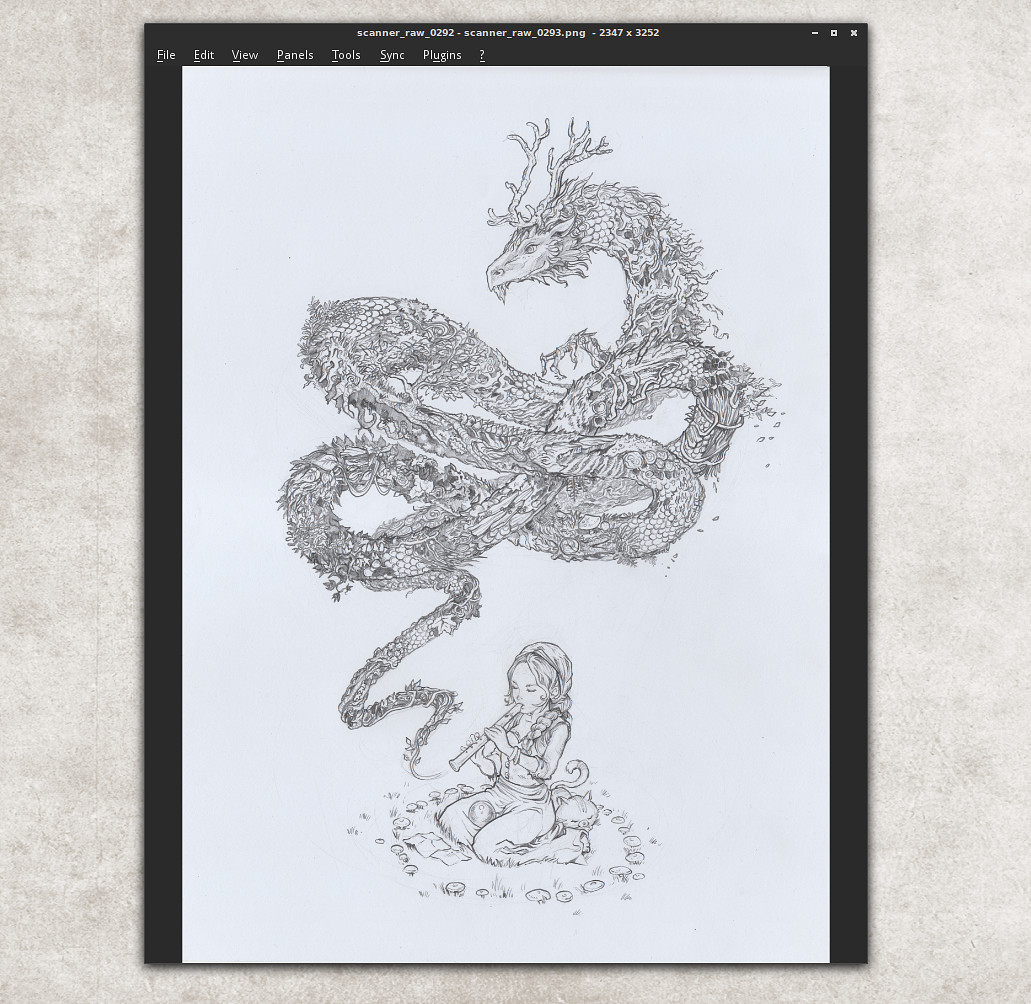
a. Traditional : pencil line art

I practiced for episode 2 and 3 this technique. Sketching with blue pencil and lines with a pencil. After scan of the pages, blue sketches is removed to clean the lines. It's popular among other comic artist, and I made a lot of effort to adapt to it. I felt frustrated with it, and pleasure to draw vanished a bit with the constrain of being too clean.


b. Digital : drawing on Cintiq

After the frustration on episode 2 and 3, I decided to use my Cintiq21UX from scratch for episode 4. The Cintiq precision is not good compare to a pencil. I had to draw zooming in the page a lot.


Even with a high zoom, it was hard to be precise. So I decided to 'sketch a bit the lines'. I felt frustrated with it too, the Cintiq doesn't have a good ergonomy in general and it's hot


The episode 5 , about 'winter holidays' was done with the 'pencil line art technique'.

c. Digital : drawing with a tablet

On the start of Episode 6, the Cintiq died in the middle of the long episode production. I wanted to try the Cintiq again with the new stabilizer of Krita. I had to finish the episode in tablet mode. Inking with a tablet is not evident, but the ratio of the Wacom Intuos3 A4 mapped too a 21,5inch 1080p screen was good enough to draw details. I could finish the episode, and was happy about this, but I wanted to change everything.


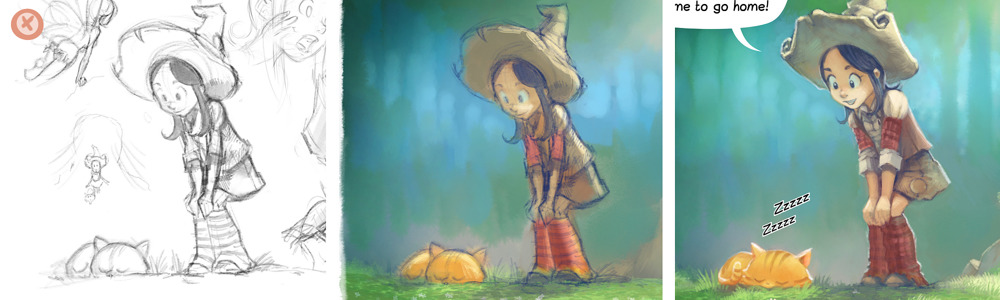
d. Digital : going full painting over a digital sketch

After the painful episode 6, I decided to try for episode 7 ,8 ( and even start of 9 ) another 100% digital method with my Intuos 3 A4. I kept digital sketches, painted under and detailed with a paint-over pass. The method is good and effective, but the rendering is a bit blury. Also, digital sketching isn't pleasant to me on a tablet. I felt my moves very constrained.


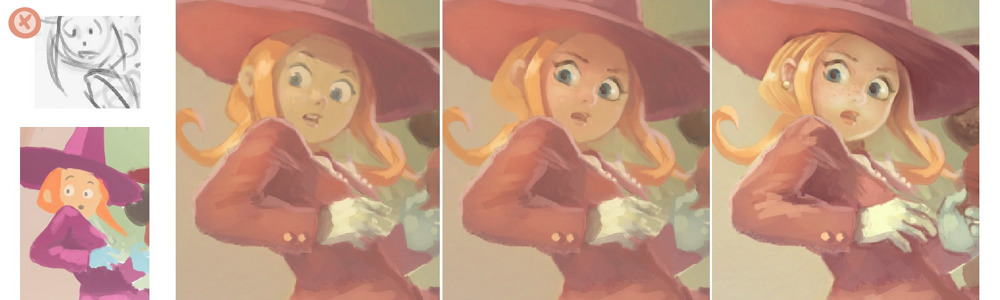
e. Digital : speedpainting then detail

On episode 9, I decided to try something new. I tried to adapt a concept-art speedpainting technique to Pepper&Carrot. I thought the method would be super effective but it took me more time, and the rendering was even more blurry. I've spent many sleepless night and injured my hand to catch the deadline...


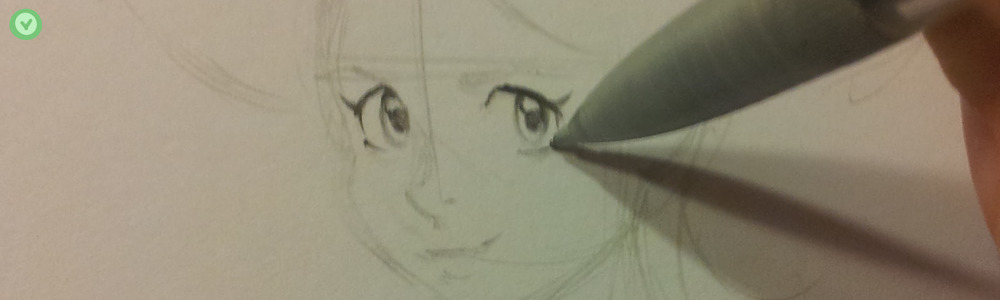
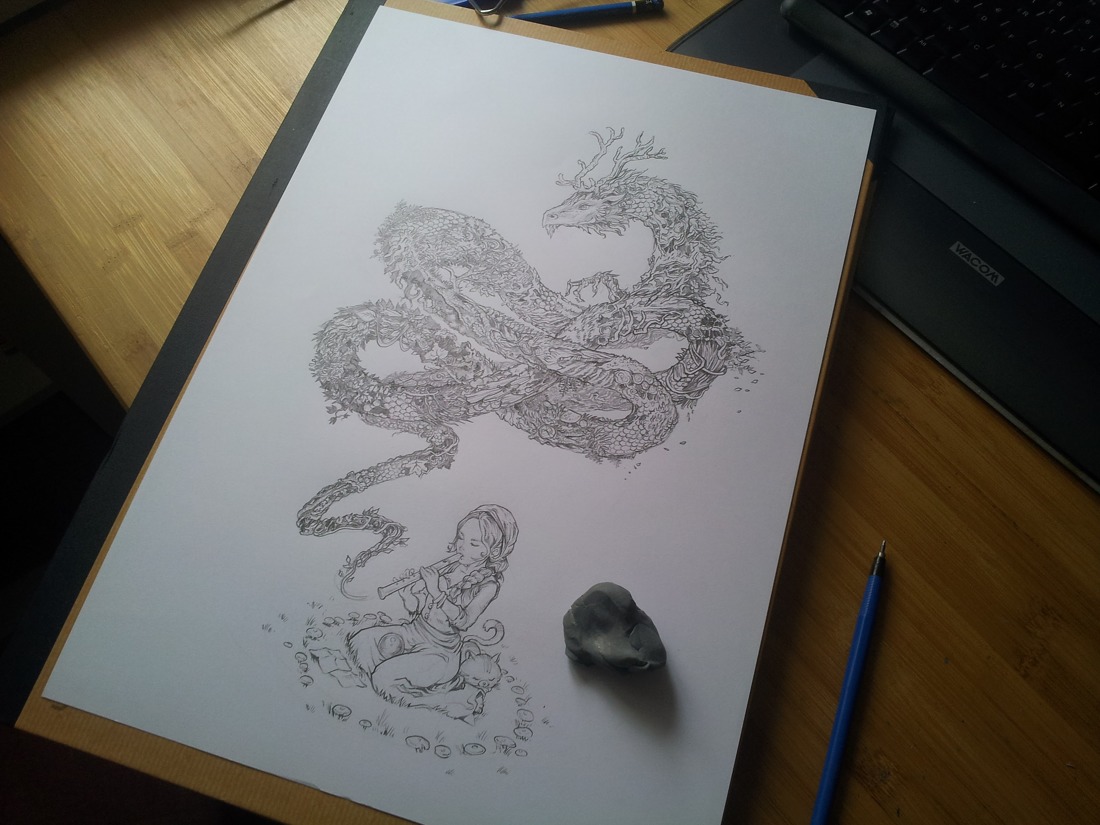
f. Traditional : pencil sketch + digital painting

On the episode 10, I decided to solve many issues, and group what was working for me. It was necessary after episode 9. In general, I have more pleasure to draw with pencils. It's more precise than any Cintiq or digital device, and I like precision. A drawing also brings me a true feedback about my true skill. 'True skill' because I can't deform, erase, undo, move the composition around. It's better for my training in general. With the experience of digital sketches from episode 7 and 8 , I understood I don't need to get clean sketches. So, I can sketch and draw the panel with letting the guidelines , crosshatching. It made my drawing time a more relaxing experience.


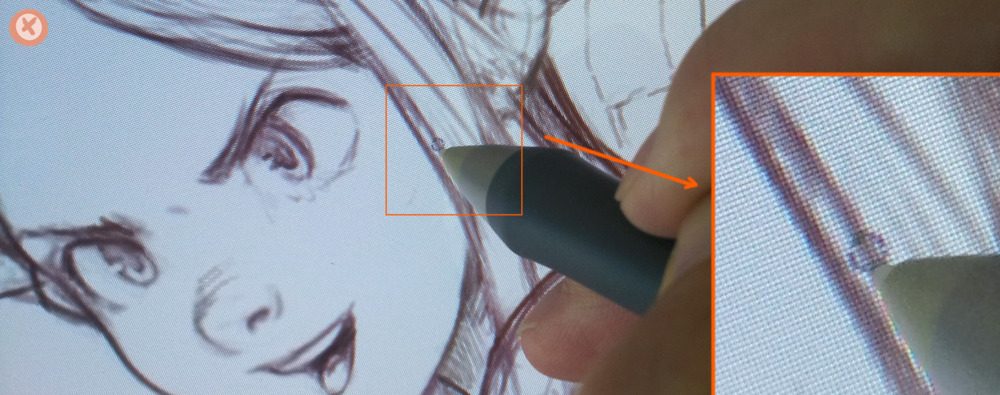
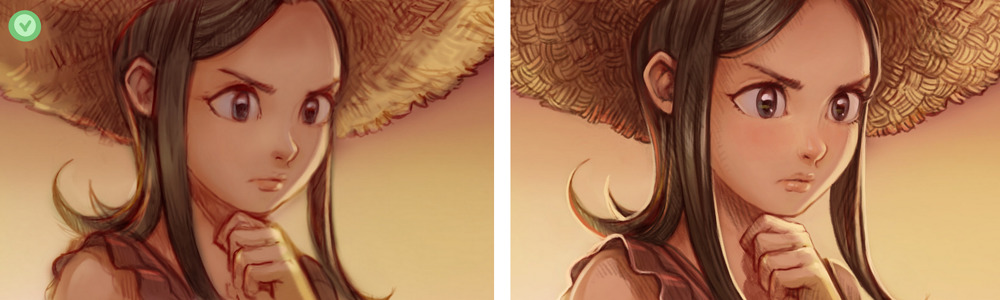
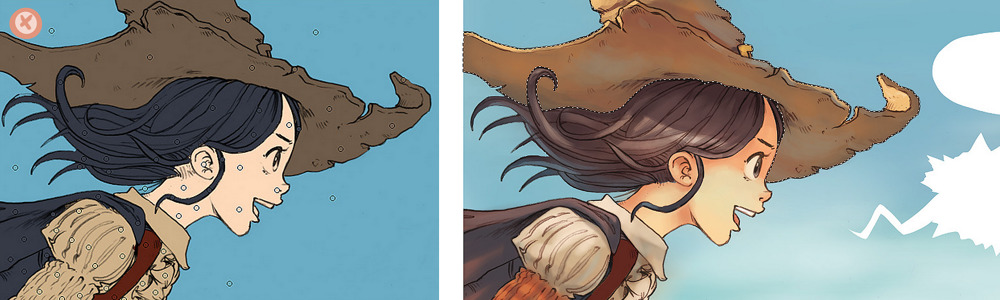
About coloring with digital ( Krita ), I keep one layer under my pencil artwork to paint the general ambiance of the panel.
Then when the global look is ok , I create a layer on the top ( or flatten all ) and start paint-over. I paint-over lines and areas. I work flat and keep the lines , but I manage them while painting.

example : the same panel from episode 10 , before paint-over ( left ) and after ( right ).


About the Gmic[colorize] filter, I still use it but more to create a quick mask of a silhouette and split areas of my drawing. I rarely use it to color every tiny islands as I could do from episode 3 to episode 6.


Conclusion


That's all, thank you for reading. I hope this summary of my experiences over the production of the first 10 episodes of Pepper&Carrot will help you in your own process.

Sketching Meetup

$
0
0

Sketching Meetup in Brussels

Living around Brussels? Join me on Sunday 20 September 2015 at 13h30 in front the Museum of Natural Sciences; I'll spend my afternoon inside sketching minerals, shells, dinosaur skeletons (the museum is famous for having the largest Dinosaur Gallery in Europe! it looks really good on their website ). We can form a little sketching group inside, and meet each other. We can share feedback, tips, and improve after a good afternoon. I'll personally work on my shape vocabulary to sketch better fantasy creatures and environments. Beginners, students, hobbyist or professionals are welcome!

Why in Brussels? I'm living in Montauban, south of France, a little city. I'll be in Brussels for a Krita Masterclass on Saturday 18 crowdfunded by 48 contributors (thank you!), and organized by the BBUG , the Belgian Blender User Group. Going to a big city as Brussels is an opportunity for me to organize something like this.


picture copyrighted by the Museum, non commercial usage allowed. Source: Museum Press Kit

Requirements:

  • Your sketchbook/paper and pens
  • Money to pay the museum entry (adult: 7€ Permanent exhibition halls)

picture copyrighted by the Musuem, non commercial usage allowed. Source: Museum Press Kit

Useful links:


A question? You'll be around?

It's the first time I try to organize a little event like this one. I hope it will be a success and inspire other artist to do the same in other cities. Leave a comment here for any question. See you soon!

Timelapse: Witches of Chaosah

$
0
0


Here is a new video-timelapse with a bit of text labels using Krita 2.9.7 on Linux Mint 17.2 Cinnamon 64bit. This artwork is a concept-art piece for my webcomic Pepper&Carrot.

Before doing this artwork, I made almost hundred sketches and doodles. It was hard to find the design of the three 'new' witches of the Chaosah school. I need them for the future episode 11. All the sketches were black and white. It was difficult to see if their design will match the style of Pepper with color and rendering. A good pretext to paint a 'proof-of-concept' artwork, rendered as I would render a panel. I had the idea to shot work-in-progress of the traditional process, then screen-record the painting. I hope you like the result and the video as well.

Full resolution of the artwork available as CC-By.

Note: Special thanks to

penciling on episode 12

Making of episode 11


Tons of potions, part.1 : 3D

Tons of potions, part.2 : Multifill

$
0
0

Source file for corrections/translation ( libreoffice draw, *.odg ) is available in this folder 

[edit 21 december 2015 ]
Thanks JA12 in the comments for sharing his ( advanced ) method in a video timelapse.
This method can do the random coloring from Blender directly.


video timelapse "Coloring a comic page"

$
0
0

During the production of the latest episode ( ep13. "The Pyjama Party" ) I managed to screen-record a sample of the coloring process done with Krita 2.9.9 . Today, I decided to edit and accelerate this 10h of videos material into a short ( 5min ) Youtube time-lapse. I hope you'll like to see how this page evolved from the black and white line-art to the final version. I also attach a link here  to the final page in the highest-resolution. 

2016

Krita mix-brushes.bundle

$
0
0

For Krita 2.9 :
Download & Install :

  • You can download directly the mix-brushes.bundle file here or from this folder (source git here).
  • Open Krita, go to Setting then Manage Resources and then click on the import Bundle/Ressources button. Select the mix-brushes.bundle file on your disk ( you'll see it if File of type is set to Resource Bundles (*.bundle) and then press Open button.
  • Done! Close the resource manager dialog. The brush should appear in your Brush Presets docker, ready to be used. 

I use this brushes more and more to paint my backgrounds ( eg. check previous artwork 'Happy Holidays' ). 

The Krita ppa for Ubuntu, Linux Mint and Elementary OS

$
0
0
( screenshot : Krita animation beta from ppa on Linux Mint 17.3 cinnamon 64bit on January 2016. )

[update January 2016, first version published on Mai 2013]

The Krita team has an official ppa ( named Krita Lime ). This ppa provides fresh versions of Krita for Linux Mint 17.3 , Ubuntu 14.04 LTS ( and Ubuntu-testing 15.10 )  and Elementary Freya 0.3 users.
To install Krita via this ppa, copy the code lines one by one ( Ctrl + C in your browser ) and paste them one by one in a terminal windows ( Ctrl + Shift + V ) then press enter. 
Note: You can only install a single version of Krita on your system.

Krita 2.9

This is the last release of Krita, in the 2.9.x series.
sudo add-apt-repository ppa:dimula73/krita
sudo apt-get update
sudo apt-get install krita-2.9

Krita animation 2.9 beta

This is a popular beta release ( in progress ) with the features 'animation' and 'level of details'. 
sudo add-apt-repository ppa:dimula73/krita
sudo apt-get update
sudo apt-get install krita-animation-testing

External links :

Ppa page for more info : https://launchpad.net/~dimula73/+archive/krita
Original Dmitry's (maintainer of the PPA and Krita developper ) blog : http://dimula73.blogspot.fr

Krita thumbnails for Nautilus,Nemo file browser

$
0
0

Nemo file browser ( Linux Mint 17.3 Cinnamon ) with Krita (*.kra files ) thumbnails 


[update January 2016, first version published on November 2013]

A thumbnailer for Krita files (*.kra) and Open Raster files (*.ora compatible Mypaint, Gimp, Krita and Pinta) for Linux : Gnome 3.x File ( Nautilus ) , Cinnamon ( Nemo )  and other compatible GTK3 compatible file browsers ( File of Elementary OS, Nautilus fork of Ubuntu , probably even SpaceFM Gtk3 ).  

Install :

Install the package, then restart the system :

Ubuntu 14.04 LTS , Linux Mint 17.1/17.2/17.3 , Elementary OS 0.3 Freya : 


Fedora : 
sudo dnf install gnome-kra-ora-thumbnailer

Arch Linux, Antergos, Manjaro AUR :


Sources ( or other distros ) : 

Custom Brushes (Stencil/Stamps) with Krita

$
0
0


Music in background: New age B by Frank Nora.

Here is a video tutorial about the creation of brushes (stamps/stencils) in Krita. I often create brushes 'on the fly' when I have to paint something repetitive (small rocks, bubbles, leaves, herbs, etc... ). It's easy and quick to create this type of brushes with the right method. With this video, I hope I'll share this knowledge.

The Mypaint ppa for Ubuntu, Linux Mint and Elementary OS

$
0
0
( screenshot : Mypaint from ppa on Linux Mint 17.3 cinnamon 64bit on February 2016. )

[original article posted on august 2011, last update: Feb 2016]

The Mypaint main developper Andrew Chadwick maintains a ppa. This ppa provides fresh versions of Mypaint for Linux Mint 17.3 , Ubuntu 14.04 LTS ( and Ubuntu-testing 15.10 )  and Elementary Freya 0.3 users.

To install Mypaint via this ppa, copy the code lines one by one ( Ctrl + C in your browser ) and paste them one by one in a terminal windows ( Ctrl + Shift + V ) then press enter. 

sudo apt-add-repository ppa:achadwick/mypaint-testing
sudo apt-get update
sudo apt-get install mypaint mypaint-data-extras

External links :

Ppa page for more info : https://launchpad.net/~achadwick/+archive/ubuntu/mypaint-testing 

Autostiching scan with Hugin

$
0
0

About Hugin:

If you like drawing on large sheet of paper but decided you can't do it because you own only a small scanner, then this article about Hugin is for you.

What is Hugin? Hugin is a free/libre open-source software. With Hugin, you can assemble a mosaic of photographs into a complete immersive panorama, stitch any series of overlapping pictures and much more. I'm using Hugin since 2010. Hugin is a very technical tool with many options. The development team is doing big effort to simplify the process, and recent versions are really easier to use than the previous one, but still not really as intuitive as modern software: I still need my notes to get things done with it. But if you know your way and settings the tool is easy. Hugin can be really faster than doing the stitching manually and produce a perfect result. Convinced? Follow me.

Install Hugin:

On Ubuntu/Elementary/Linux Mint (Ctrl+C to copy line in your browser, Ctrl+Shift+V to paste on terminal. One line at a time).
sudo add-apt-repository ppa:hugin/hugin-builds
sudo apt-get update
sudo apt-get install hugin
On other Linux distro, Mac and Windows , check the download page of the project.

The process, step by step:

1. Here the problem start: I like drawing on A3 sized paper (29,7x42 centimeter / 11.69x16.53 inches), it's double size than A4 and have more room for drawings details. 


2. But I don't have a A3 scanner at home : they are expensive and take a lot of room. I also have no idea where I could find a A3 scanner compatible with Linux. It's only problems, so I have to find a solution with my A4 scanner. A4 scanner are cheap and nowaday bundled with many printers 'all in one' devices. Here under my old Canon Pixma MP560 all-in-one printer scanner with a A3 sheet in the A4 scan top part. I'm scanning my big A3 artwork documents this way in two time, flipping the artwork upside down on the little scanner. 


3. I scan them with Xsane on Linux Mint 17.3. I like Xsane because if you remove all unecessary panels and keep only the main user interface, it can just scan and auto-save the picture in a target folder. This way,  I get two PNG files in sRGB , A4 sized with 300ppi quality (selected in blue here).


4. Here is the two scanned documents. I often have white margin all around the artwork, I rarely draw on all the surface of the A3. Only a central part of it. This way I need only two scans to get the full artwork scanned with an overlapping area. It's important to have overlaps. Hugin will use the informations in the overlapping area to match the document together and stich them perfectly.


5. Before feeding Hugin with our raw scans, we need to prepare them a bit. That's why I'm rotating the second scan at 180° thanks to the editing functions of the image viewer Nomacs

6. The preparation is all about filenaming and alignement. The filenames must follow and images must have similar orientation. Hugin does a good job only if the images are ready this way.


7. We can finally open Hugin. Maybe in your operating system's menu, there is multiple entries for Hugin. Select the one named "Hugin Panorama creator" in this case then press the 'Load images...' button.


8. [1] Do a multiple selection to select your files ( holding Ctrl key ) then [2] press 'Open'.


9. After the files are selected, you'll see this unfriendly dialog prompting you for a 'HFOV(v)' number [1]. Don't ask me what a 'HFOV(v) number' is, I have no idea. Just  remember for this field to enter '10' degrees. This magic number come from an outdated official tutorial. You'll be stuck at this dialog if you don't remember it. Too bad a simple 'scanner' preset don't exist here to make this step intuitive... When it's done, Then press [2] 'OK'. 


10. Press the [1] 'Align' button, it should pop-up a console with computer output you don't need to read (it will auto-close itself anyway). Just check your picture properly aligned after that within the control screen [2].


11. The last step, is to [1] Press the 'Create Panorama...' button, [2] switch the format to PNG , [3] Select the only option available and [4] press OK.


12. You'll be prompted for saving two files. Just keep the default name and press OK. Then another console will pop-up with computer output, just wait it to finish, it will close itself. You should have a new dialog on screen indicating 'Status Completed'. 


13. Check your files on your file explorer: your autostiched version should be done. You can then close all windows of Hugin and delete the two original half-scan and the *.pto files created by Hugin. 


14. A last step is just a little rotation with the image viewer Nomacs and saving.  

15. It's done :  the two scanned parts of the picture were autostiched in a single picture thanks to Hugin. You can't notice the area where the two scanned were merged, even if you zoom on the paper texture itself. It's really perfect work.


★ You can find the hi-resolution result here . 
★ The final colored artwork here  (note: I removed the flute girl for artistic reasons.)

That's all for today and Hugin. If you practise, you can scan many large comic pages and stich them in no time with just clicking at the right button and fighting a bit with pop-ups and temporary files. I hope this tutorial will help you to draw on larger sheet of paper and take advantage of this great tool.

A big thanks to the Hugin developpers! 

Drawing timelapse with krita, commented

$
0
0

Here is a commented accelerated timelapse about a drawing session I did for practising and reviewing my lineart skill. The theme: the four characters of my webcomic Pepper&Carrot, Pepper, Coriander, Shichimi and Saffron. The video focus on the creation of a single character, Saffron. The process for the other characters is similar and so the playback is just accelerated for them.
In this video I'm giving tips about drawing in general, about the Stabilizer, about the tool-option as a button on the toolbar, and about line-weight. The timelapse stop when all characters are 'inked'. I'll probably do not colorize this artwork as I did it only to practise drawing. But if you want to colorize it, feel free to download the source file and give it a try.

★ Ink/drawing brushes (for Krita): 2016-02-25_drawing-video-timelapse.bundle
★ Artwork source (*.kra file): 2016-02-25_characters-lineart_by-David-Revoy.zip

00:48 Chapter 1: My setup ( Tool option as button on toolbar + Stabilizer setting )
02:00 Chapter 2 : Sketching
05:45 Chapter 3 : Line Art
13:00 End credit with license, infos.

Building Krita 3.0 on Linux for cats

$
0
0

Intro :


Changelog:
[24 apr 2016]  (update!) Krita 3.0, Compatible Ubuntu 16.04
[ 7 may 2015] Refactoring for using the 2.9 branch while Krita split Calligra 
[18 nov 2013] First publishing, during Krita 2.7 development

Why?

I wrote this guide after maintaining during a full-year a set of scripts to help user to compile and install Krita. This project was named  Compilscripts and I decided to stop supporting it because build script always breaks: when something irregular happens, Compilscript fail and stop to work  ...  And irregularities are common on Linux.  The user is dependent of a system he doesn't understand. And when it breaks, it breaks his production without letting him know how to fix it. That's not a solution. That’s why I thought the best approach is the Arch-way not to give an automatic tool , but creating a documentation dead-easy to make artist independent in the process and understand what they do. Artists should be able to install, update, go back in the history of code if something doesn’t work for them ; all of this with a minimal and easy to use documentation.


Fully illustrated:

I also offer here a set of illustrations about compiling ( all are released under CC-By  ). I hope those picture will help other project's documentation to be more user friendly and appear more simple to understand by using a simple analogy : a cat building a house. 

But why for cats ? 

Because it's well known on the Internet : you can't go wrong with cats. 


Setup directories


First obligatory step : preparing the place. Around 5GB of disk space will be needed on your home folder. We will set the structure advised by developers :
  • /home/<your-user-name>/krita/src     for the source code.
  • /home/<your-user-name>/krita/build   where Krita will be built
  • /home/<your-user-name>/krita/inst  where Krita will be installed

Note : understand <your-user-name>as your user name on this documentation ( Ex :  /home/deevad/krita/src )


To do it, open a Terminal,  copy the line under (Ctrl+C) then paste it on the Terminal (Ctrl+Shift+V ) :

mkdir -p ~/krita/src ~/krita/build ~/krita/inst


Also check with your distribution package-manager that no calligra and krita packages are installed.

Use the search field of your package manager and remove packages.


Get the source code


Navigate your folder using the command cd ( change directories ) and the tab key for auto-completion.
cd ~/krita

Install git from your distribution package-manager ( eg. for Ubuntu; sudo apt install git )
Then ask git to download the source files in your src folder, pasting this line code in the Terminal , on the ~/krita directory :
git clone git://anongit.kde.org/krita.git src

So we enter the Krita source folder, then check if everything is updated :
cd src
git pull


Get the libraries and dependencies


This part can be tricky : each distribution got a different way to manage packages and so installing required libraries.

Krita needs a large amount of very fresh libraries (you'll need a GNU/Linux distribution with fresh packages) and there is not always a single command to get them. 

The best place to share installation instruction for dependencies is the KDE Community Wiki : https://community.kde.org/Krita/linuxbuild
( Note : this link is a wiki, so don't hesitate to edit, correct, and then smooth the installation process for other artist later. )  

If your distribution is not listed, or if you don't have the choice, the plan B is to find them one by one on your package manager . it sounds painfull, but no choice. In your sources, the file ~/krita/src/krita/3rdparty/README.md might help you to get advanced informations. ( you can also read an online version here ).

Here I'm on Ubuntu 16.04 , I'm using this command to install all library I need :

sudo apt install build-essential libcurl4-gnutls-dev libtiff5-dev libjpeg-turbo8-dev libpng12-dev gettext gettext-kde cmake git extra-cmake-modules libkf5archive-dev libkf5completion-dev libkf5config-dev libkf5coreaddons-dev libkf5guiaddons-dev libkf5i18n-dev libkf5itemmodels-dev  libkf5itemviews-dev libkf5widgetsaddons-dev libkf5windowsystem-dev libkf5kiocore5 qtbase5-dev libqt5svg5-dev qtdeclarative5-dev libqt5x11extras5-dev libqt5opengl5-dev libeigen3-dev libxi-dev libboost-all-dev libopenexr-dev libexiv2-dev  libgsl0-dev liblcms2-dev libpoppler-qt5-dev shared-mime-info libraw-dev libfftw3-dev libopencolorio-dev libopenjpeg-dev vc-dev


Configuring


Configuring with cmake will check if your system is ready and if you get the good libraries installed. So, if any configuration problem happen you'll be able to read what libraries are missing. That's why it's important to read if all is ok.

Also, we will inform cmake our directories structure :
cd ~/krita/build 
cmake -DCMAKE_INSTALL_PREFIX=$HOME/krita/inst $HOME/krita/src -DWITH_GMIC=ON -DCMAKE_BUILD_TYPE=RelWithDebInfo -DPRODUCTSET=ALL -DPACKAGERS_BUILD=ON -DBUILD_TESTING=OFF -DKDE4_BUILD_TESTS=OFF


Building


After reading the configure output, if all sounds ok , then it's time to build your own Krita.
Still on the folder /krita/build, call make with -j<number>, where <number> has to be replaced with the number of parallel job your processor is able to do ( and +1 recommended sometime ). Mine is a 8 core, let's use -j9 .
make -j9

Tip : if you don't know the number of core you have, this little command will answer you the number :

cat /proc/cpuinfo | grep processor | wc -l


Installing


If make built all the part of Krita without getting a mistake, and till 100% , you can ask make to install it in our install folder.
make install -j9


Path and environment variables


Your install is now done, but your system will not consider your install folder as a part of your system's application.
Let's show to your system the right path, inside a Terminal, copy line by line :
export KDEDIRS=$HOME/krita/inst:$KDEDIRS
export PATH=$HOME/krita/inst/bin:$PATH

Unfortunately those environment variable are not persistent, and will be lost after a shutdown or a restart of your system and our bridge will collapse.
To set them at any login , write them with your favorite text editor at the end of your ~/.profile file ( on certain distribution, the profile is named xprofile , check your hidden file in your home/<your-user-name> folder ).


First run


Congratulation ! you can run "last-Krita-from-a-minute-ago" by typing krita on a Terminal or via your desktop main menu.
If this one doesn't show Krita, look at your desktop-environment 's documentation : "how to create a custom launcher" .

Updating


You've heard of a new feature developed , or you read about an annoying bug fixed, and want to update ?
Fine, call git again . This time it will only append to your source folder the missing code lines. Not downloading the whole source pack.


cd into the source folder, then ask git to pull to update your source :
cd ~/krita/src/
git pull


But updating the source will not be sufficient ; to experience your new Krita version, we need to repeat the configure,compile and install process :
cd ~/krita/build
cmake -DCMAKE_INSTALL_PREFIX=$HOME/krita/inst $HOME/krita/src -DWITH_GMIC=ON -DCMAKE_BUILD_TYPE=RelWithDebInfo -DPRODUCTSET=ALL -DPACKAGERS_BUILD=ON -DBUILD_TESTING=OFF -DKDE4_BUILD_TESTS=OFF make -j8
make install -j8

If you update daily, you might like to automatise those command by making your own minimal bash script.


Rescuing


Recent development version might break, and sometime be unusable. Experimental changes are made daily.

It might affect your productivity if you don't know how to 'go back in time' ( ex: your favorite brush doesn't work anymore ).

But If you know how to do it, no issue can really affect you, because you know how to come back to a previous state.


To travel the source in time we need to read the timeline history. The Terminal tool for it is git log
cd ~/krita/src
git log


With git log , you can consult all the last changes to the code, named 'commit' . What interrest us is the long identification number ( ex: cca5819b19e0da3434192c5b352285b987a48796 ). You can scroll git log , copy the ID number then quit ( letter Q on keyboard ). Then time-travel your source directory :

git checkout cca5819b19e0da3434192c5b352285b987a48796 


Now, configure, compile, and you'll be again in a safe place. Note that I advice the packages gitg or gitk to have a graphic user interface to visualise git history. Also an online version exist here .


To update again to the actual and fresh from a minute ago source-code named master , simply ask git to come back to it with git checkout  then  pull to update :

git checkout master
git pull

Conclusion

I hope this documentation will help many user to have good time using Krita development version.
Use the comments to give your feedbacks or ask questions, I'll do my best to update the information on this page.


Useful Links :
- Official Krita development wiki 'Build instructions'.
- The /krita/3rdparty/README.md file 
- Krita Git activities and history 
- List of the last updated Krita bugs
- Form to enter a Krita bug
- Krita blog
- Krita forum
- Krita IRC channel  ( answer can arrive sometime after 1 or 2h, be patient )

Special Thanks :
Boudewijn Rempt, Aurélien Gâteau, M.Beast, Yu Asakusa, Matthieu Harelfor feedback and help with corrections.
Gerson Alvarado for Spanish translation. 

Translations available : 
- Español, by Gerson Alvarado : Lewatoto's blog 
- Polish, by Adam Druzd : Adam's blog

Viewing all 526 articles
Browse latest View live